This tutorial describes steps to set up an EMR cluster with Alluxio as a distributed caching layer for Hive, and run sample queries to access data in S3 through Alluxio.
Prerequisites
- Install AWS command line tool on your local laptop. If you are running Linux or macOS, it is as simple as running pip install awscli.
- Create an EC2 Key Pair from the EC2 console if you don't have an existing one.
Step1: Create an EMR cluster
First, let us create an EMR cluster with Hive as its built-in application and Alluxio as an additional application through bootstrap scripts. The following command will submit a query to create such a cluster with one master and two workers instances running on EC2. Remember to replace "alluxio-aws-east" in the following command with your AWS keypair name, and "m4.xlarge" with the EC2 instance type you like to use. Check out this page for more details of this bootstrap script.
$ aws emr create-cluster \ --release-label emr-5.25.0 \ --instance-count 3 \ --instance-type m4.xlarge \ --applications Name=Hive \ --name 'EMR-Alluxio' \ --bootstrap-actions \ Path=s3://alluxio-public/emr/2.0.1/alluxio-emr.sh,\ Args=[s3://apc999/emr-tutorial/example-ml-100] \ --configurations https://alluxio-public.s3.amazonaws.com/emr/2.0.1/alluxio-emr.json \ --ec2-attributes KeyName=alluxio-aws-east
You can checkout the progress at AWS EMR console. This process can take 5 to 10 minutes until the status shows "Waiting Cluster ready" as shown in the screenshot below.
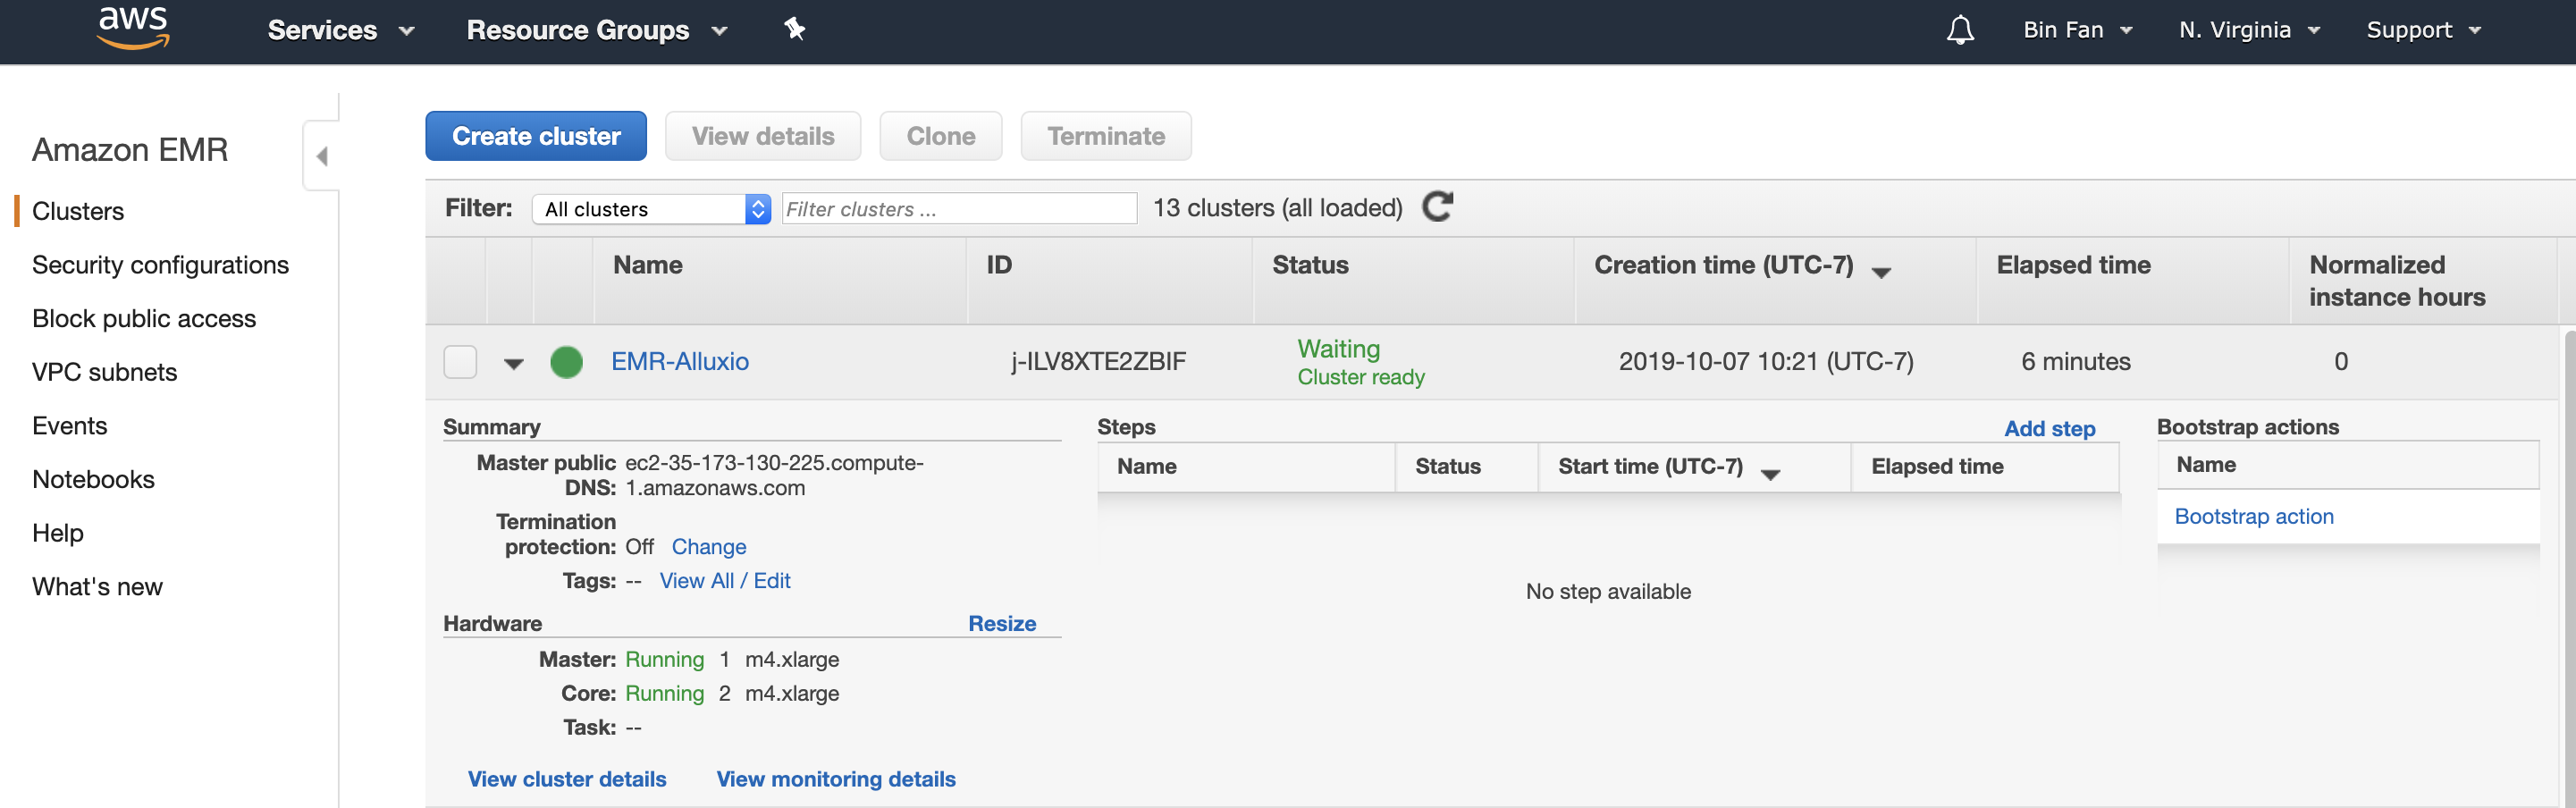
So far, we have a three-node cluster running.
Step2: Create a Hive Table on Alluxio
Log in to the master node (its hostname will be different from your runs, check the "Cluster details" on the console page).
$ ssh -i /path/to/alluxio-aws-east.pem hadoop@ec2-35-173-130-225.compute-1.amazonaws.com
Check if the S3 bucket "apc999" with my example input data has been properly mounted. Note that, this bucket is pre-configured to be a public bucket and accessible for all AWS users.
[hadoop@ip-172-31-30-29 ~]$ alluxio fs mount s3://apc999/emr-tutorial/example-ml-100 on / (s3, capacity=-1B, used=-1B, not read-only, not shared, properties={}) [hadoop@ip-172-31-30-29 ~]$ alluxio fs ls -R / 1 PERSISTED 10-07-2019 20:32:09:071 DIR /ml-100k 22628 PERSISTED 10-01-2019 07:15:07:000 100% /ml-100k/u.user
Start Hive and run a simple HQL query to create an external table “users” based on the file in Alluxio directory /ml-100k:
[hadoop@ip-172-31-30-29 ~]$ hive > DROP TABLE IF EXISTS users; > CREATE EXTERNAL TABLE users ( userid INT, age INT, gender CHAR(1), occupation STRING, zipcode STRING) ROW FORMAT DELIMITED FIELDS TERMINATED BY ',' LOCATION 'alluxio:///ml-100k';
Step3: Query the Hive Table
After creating this external table, run Hive with the following query to scan the table users and select the first 10 records from this table:
> SELECT * FROM users limit 10;
You will see results like
1 24 M technician 85711 2 53 F other 94043 3 23 M writer 32067 4 24 M technician 43537 5 33 F other 15213 6 42 M executive 98101 7 57 M administrator 91344 8 36 M administrator 05201 9 29 M student 01002 10 53 M lawyer 90703
Step4: Write a New Table
Let us mount a new bucket where you have write permission on the same Alluxio file system namespace. Make sure you can write to this bucket address. In my example, I mounted a new Alluxio directory /output with a writable bucket path (to me only) under s3://apc999/output.
[hadoop@ip-172-31-30-29 ~]$ alluxio fs mount /output s3://apc999/output Mounted s3://apc999/output at /output
Inside Hive, write a new table to the output directory:
> DROP TABLE IF EXISTS new_users; > CREATE EXTERNAL TABLE new_users ( userid INT, age INT, gender CHAR(1), occupation STRING, zipcode STRING) LOCATION 'alluxio:///output/'; > INSERT OVERWRITE TABLE new_users SELECT * from users;
The above queries will create a new table called new_users based on the same content in table users. One can check the data inside alluxio:///output:
[hadoop@ip-172-31-30-29 ~]$ alluxio fs ls -R /output 22628 PERSISTED 10-07-2019 21:36:22:506 100% /output/000000_0
Summary
In this tutorial, we demonstrate how to run EMR Hive with Alluxio in a few simple steps based on Alluxio boot-strap scripts. Feel free to ask questions at our Alluxio community slack channel.
.png)
Blog


Learn about the new features in Alluxio AI 3.8 designed to eliminate two of the most painful bottlenecks in modern AI pipelines. Introducing Alluxio S3 Write Cache, which dramatically reduces object store write latency and improves write-heavy workload performance, and Safetensors Model Loading Acceleration that delivers near-local NVMe throughput for model weight loading