AI at Full Throughput
and Ultra Low Latency
Compute-side distributed caching for large-scale AI workloads.
ALLUXIO POWERS
AI BUILDERS, PLATFORMS, & SERVICES


When Storage Becomes the Bottleneck
AI Slows Down
Modern AI workloads demand fast, efficient access to massive datasets.
But AI/ML teams face:
Training Delays
Slow Inference Cold Starts
Inefficient Data Movement
Rising Data Transfer and Storage Costs
Your models are getting bigger.
Your pipelines don't have to get slower.
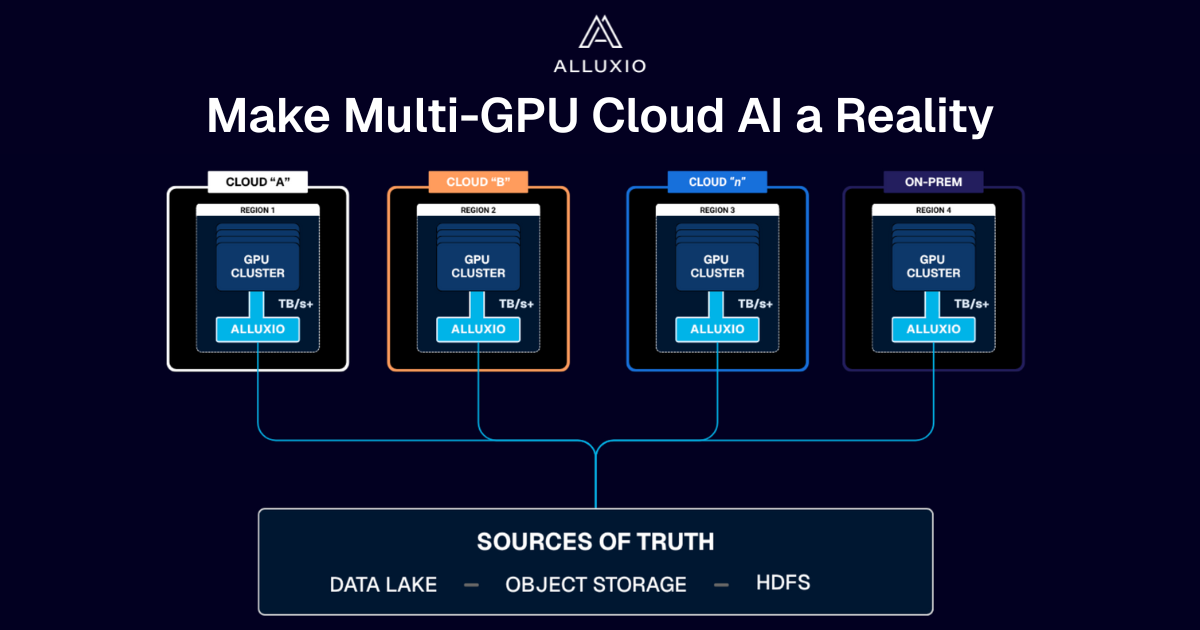
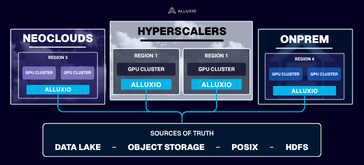
A Distributed Cache Built for AI
Alluxio sits between your compute and persistent storage, acting as a high-throughput, low-latency cache that accelerates I/O-intensive AI workloads.


From data prep to training to inference, serve data to AI workloads at local NVMe speed
AI data, cached instantly. No scp, no rsync - just fast, on-demand access while your source of truth data stays put
No rewrites, workflow changes, or replatforming required - S3 API, POSIX, and Python support
Improve GPU utilization and reduce data movement, egress, and cloud access fees
Alluxio Customer Spotlight
Dyna Robotics
Cutting-edge embodied AI company, Dyna Robotics, improved foundation model training performance by 35% by deploying Alluxio as a distributed caching and data access layer. Faster training enabled more frequent model updates, faster quality improvements, and accelerated commercial rollout of the company's flagship DYNA-1 foundation model.
"
In the highly competitive landscape of embodied AI, having a high-performance, scalable, and reliable AI infrastructure is absolutely critical. Alluxio, as the data acceleration layer for our foundation model training infrastructure, has proven to be an extremely valuable partner in our journey to commercial success.
Lindon Gao
CEO Dyna Robotics
Why Alluxio AI?
Unlike legacy distributed file systems or general-purpose storage solutions,
Alluxio is:
Caching, Not Storage
AI Native
Cloud and Storage Agnostic
Transparent & Developer Friendly
Not another Lustre, Ceph, or Weka.
Alluxio AI brings caching to the core of your existing AI data pipelines.
Ready to Make AI Faster?
Discover how Alluxio AI fits into your stack.
See it in action with a personalized demo.
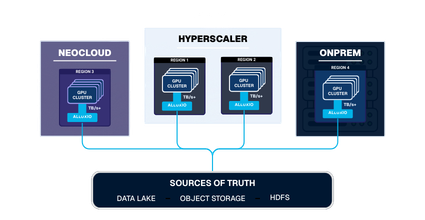
Regardless of your stack, Alluxio has your back.
Alluxio accelerates PyTorch, TensorFlow, Spark, and Ray workloads running on bare-metal, virtual machines, and Kubernetes. Alluxio supports single cloud, multi-cloud, hybrid-cloud, or completely on-premise environments.
AI Frameworks


Clouds & Hyperscalers