Blog

.png)

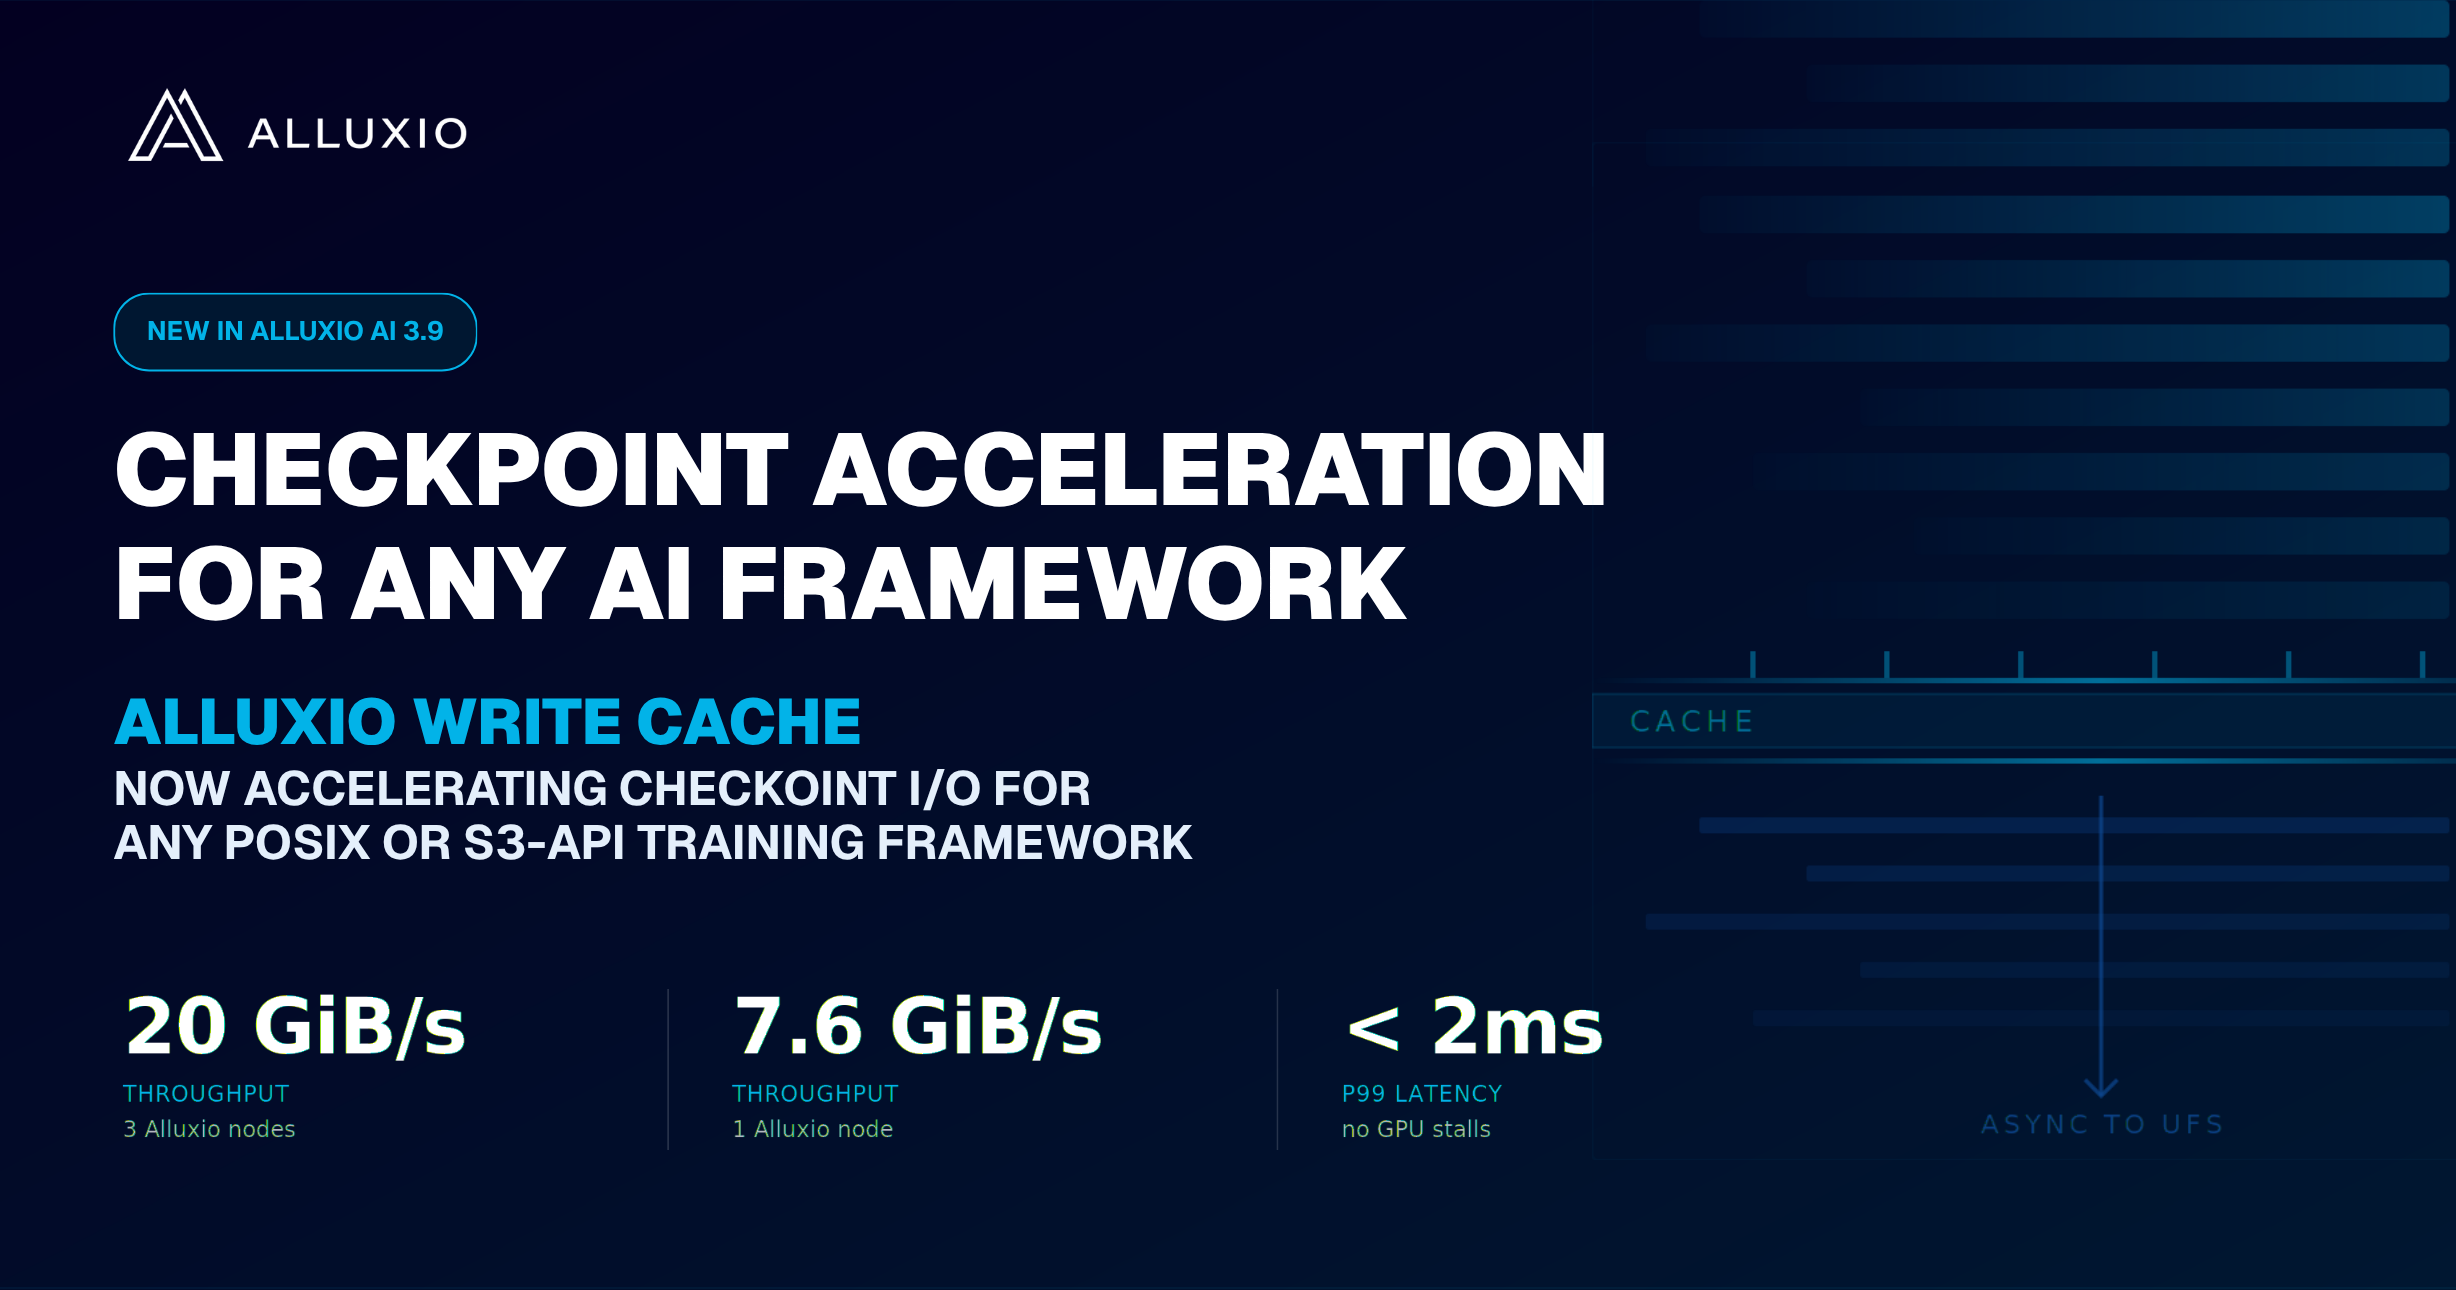
Learn about the new features in Alluxio AI 3.8 designed to eliminate two of the most painful bottlenecks in modern AI pipelines. Introducing Alluxio S3 Write Cache, which dramatically reduces object store write latency and improves write-heavy workload performance, and Safetensors Model Loading Acceleration that delivers near-local NVMe throughput for model weight loading
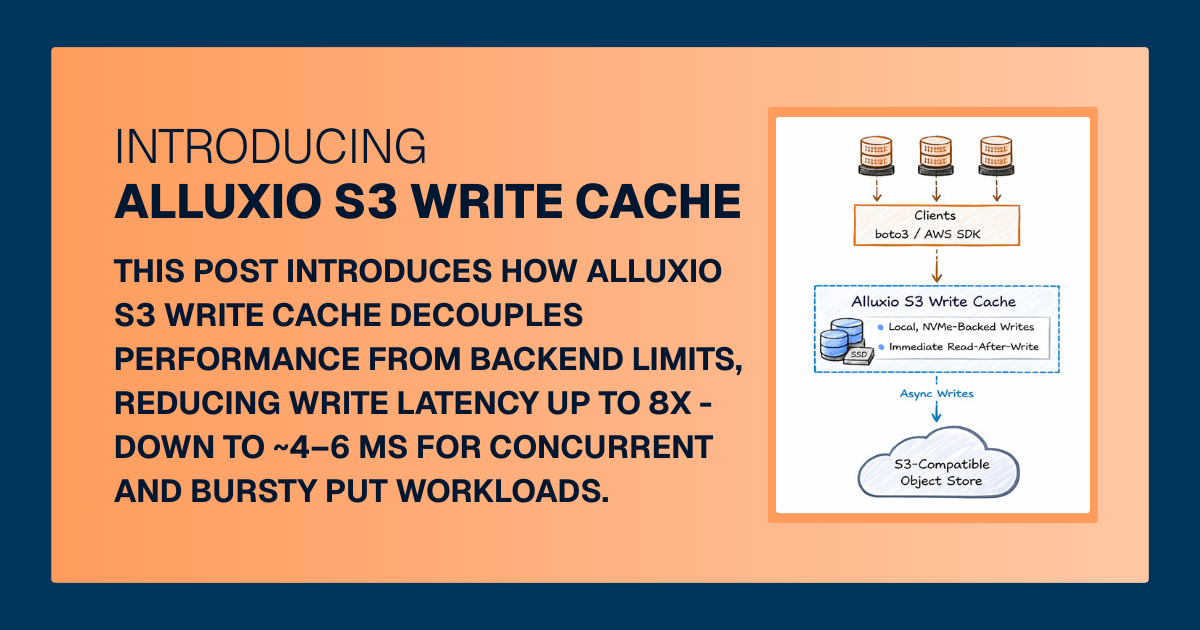
For write-heavy AI and analytics workloads, cloud object storage can become the primary bottleneck. This post introduces how Alluxio S3 Write Cache decouples performance from backend limits, reducing write latency up to 8X - down to ~4–6 ms for concurrent and bursty PUT workloads.
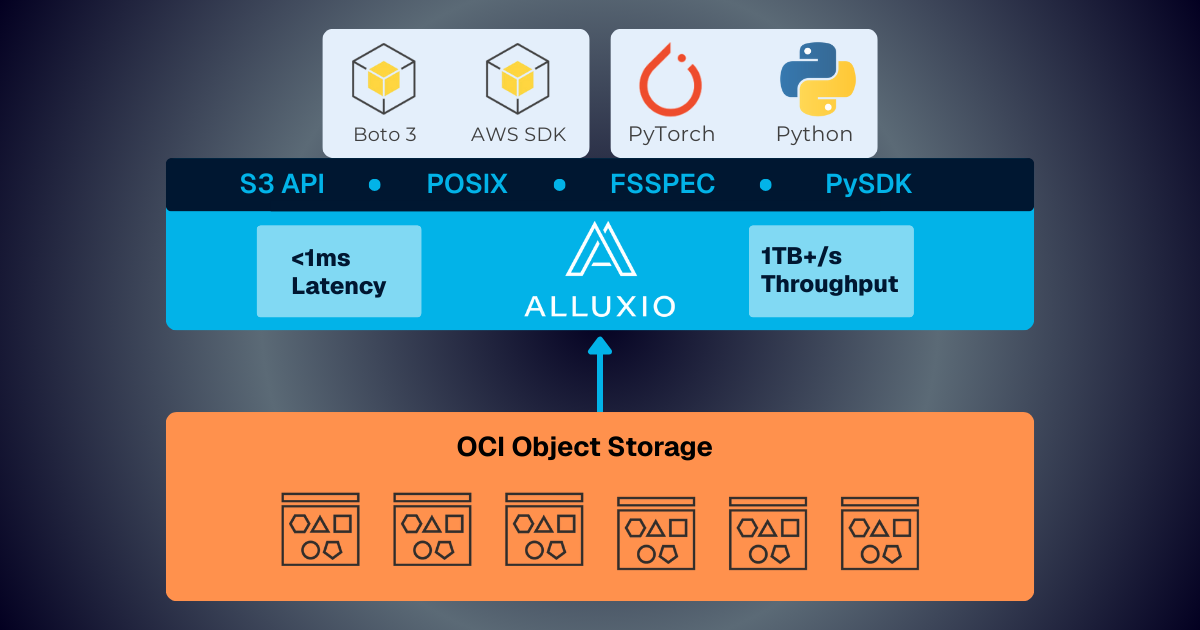
Oracle Cloud Infrastructure has published a technical solution blog demonstrating how Alluxio on Oracle Cloud Infrastructure (OCI) delivers exceptional performance for AI and machine learning workloads, achieving sub-millisecond average latency, near-linear scalability, and over 90% GPU utilization across 350 accelerators.

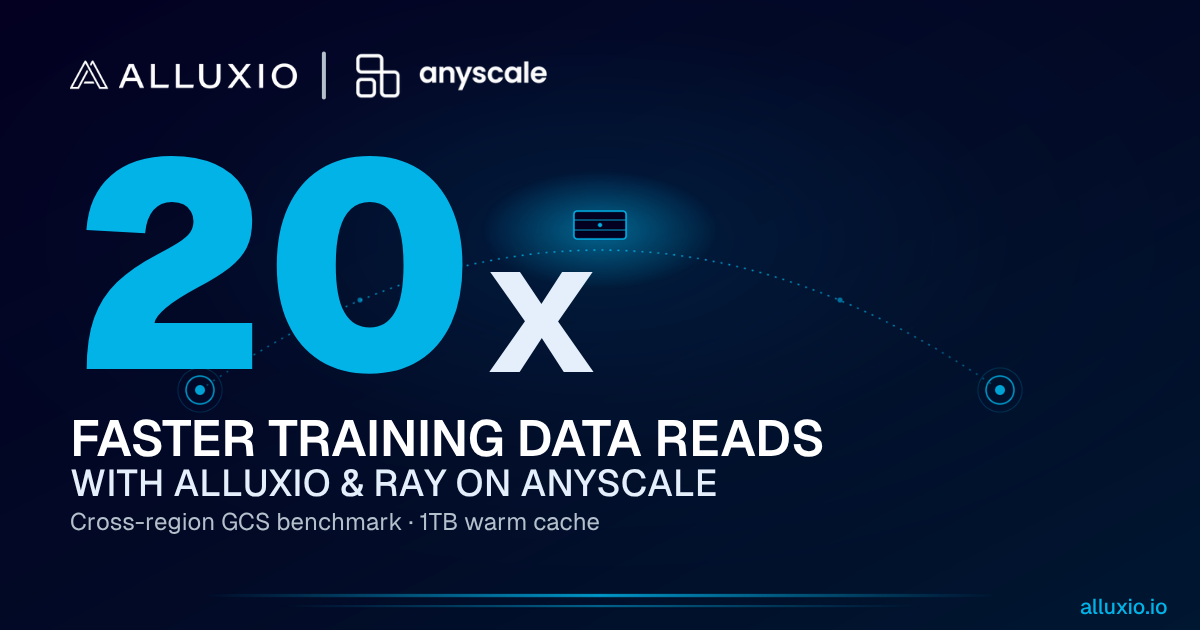
If you’re building large-scale AI, you’re already multi-cloud by choice (to avoid lock-in) or by necessity (to access scarce GPU capacity). Teams frequently chase capacity bursts, “we need 1,000 GPUs for eight weeks,” across whichever regions or providers can deliver. What slows you down isn’t GPUs, it’s data. Simply accessing the data needed to train, deploy, and serve AI models at the speed and scale required – wherever AI workloads and GPUs are deployed – is in fact not simple at all. In this article, learn how Alluxio brings Simplicity, Speed, and Scale to Multi-GPU Cloud deployments.

Turn your existing S3 storage into an AI-ready storage layer with sub-ms latency and terabytes per second throughout per Alluxio cluster with linear scalability — no data migration required.

Alluxio's strong Q2 featured Enterprise AI 3.7 launch with sub-millisecond latency (45× faster than S3 Standard), 50%+ customer growth including Salesforce and Geely, and MLPerf Storage v2.0 results showing 99%+ GPU utilization, positioning the company as a leader in maximizing AI infrastructure ROI.
In this blog, Greg Lindstrom, Vice President of ML Trading at Blackout Power Trading, an electricity trading firm in North American power markets, shares how they leverage Alluxio to power their offline feature store. This approach delivers multi-join query performance in the double-digit millisecond range, while maintaining the cost and durability benefits of Amazon S3 for persistent storage. As a result, they achieved a 22 to 37x reduction in large-join query latency for training and a 37 to 83x reduction in large-join query latency for inference.

Super Boosting Your Agentic AI & Inference Workloads
In the latest MLPerf Storage v2.0 benchmarks, Alluxio demonstrated how distributed caching accelerates I/O for AI training and checkpointing workloads, achieving up to 99.57% GPU utilization across multiple workloads that typically suffer from underutilized GPU resources caused by I/O bottlenecks.

Learn about the latest features in Alluxio AI 3.6, including Accelerated AI Cold Starts for inference servers, pushdown parquet query acceleration, and more!

Coupang, a Fortune 200 technology company, manages a multi-cluster GPU architecture for their AI/ML model training. This architecture introduced significant challenges, including:
- Time-consuming data preparation and data copy/movement
- Difficulty utilizing GPU resources efficiently
- High and growing storage costs
- Excessive operational overhead maintaining storage for localized data silos
To resolve these challenges, Coupang’s AI platform team implemented a distributed caching system that automatically retrieves training data from their central data lake, improves data loading performance, unifies access paths for model developers, automates data lifecycle management, and extends easily across Kubernetes environments. The new distributed caching architecture has improved model training speed, reduced storage costs, increased GPU utilization across clusters, lowered operational overhead, enabled training workload portability, and delivered 40% better I/O performance compared to parallel file systems.