Users today have a variety of options of cost-effective and scalable storage for their Big Data or Machine Learning applications, from the distributed storage system like HDFS, ceph to cloud storage like AWS S3, Azure Blob store, Google Cloud Storage. These storage technologies have their own APIs. This means that developers need to constantly learn new storage APIs and develop their code using these APIs.
In some cases, for example, machine learning / deep learning workloads, the frameworks don’t have integrations to all the needed storage-level APIs, and a lot of data engineering needs to be done to move the data around. It has become common practice to move data sets from the HDFS data lake to the local compute instances of the data scientist to achieve data locality and access data via the local file system.
This article aims to provide a different approach to help connect and make distributed files systems like HDFS or cloud storage systems look like a local file system to data processing frameworks: the Alluxio POSIX API. To explain the approach better, we used the TensorFlow + Alluxio + AWS S3 stack as an example.
The Alluxio POSIX API can make any distributed file system or cloud storage look like a local file system. The following section will walk you through a various aspect of this API and the approach in general:
- Overview of Alluxio POSIX API and why it is different from alternative solutions
- Steps to setup Alluxio POSIX API
- Hands-on examples to run TensorFlow on top of Alluxio POSIX API
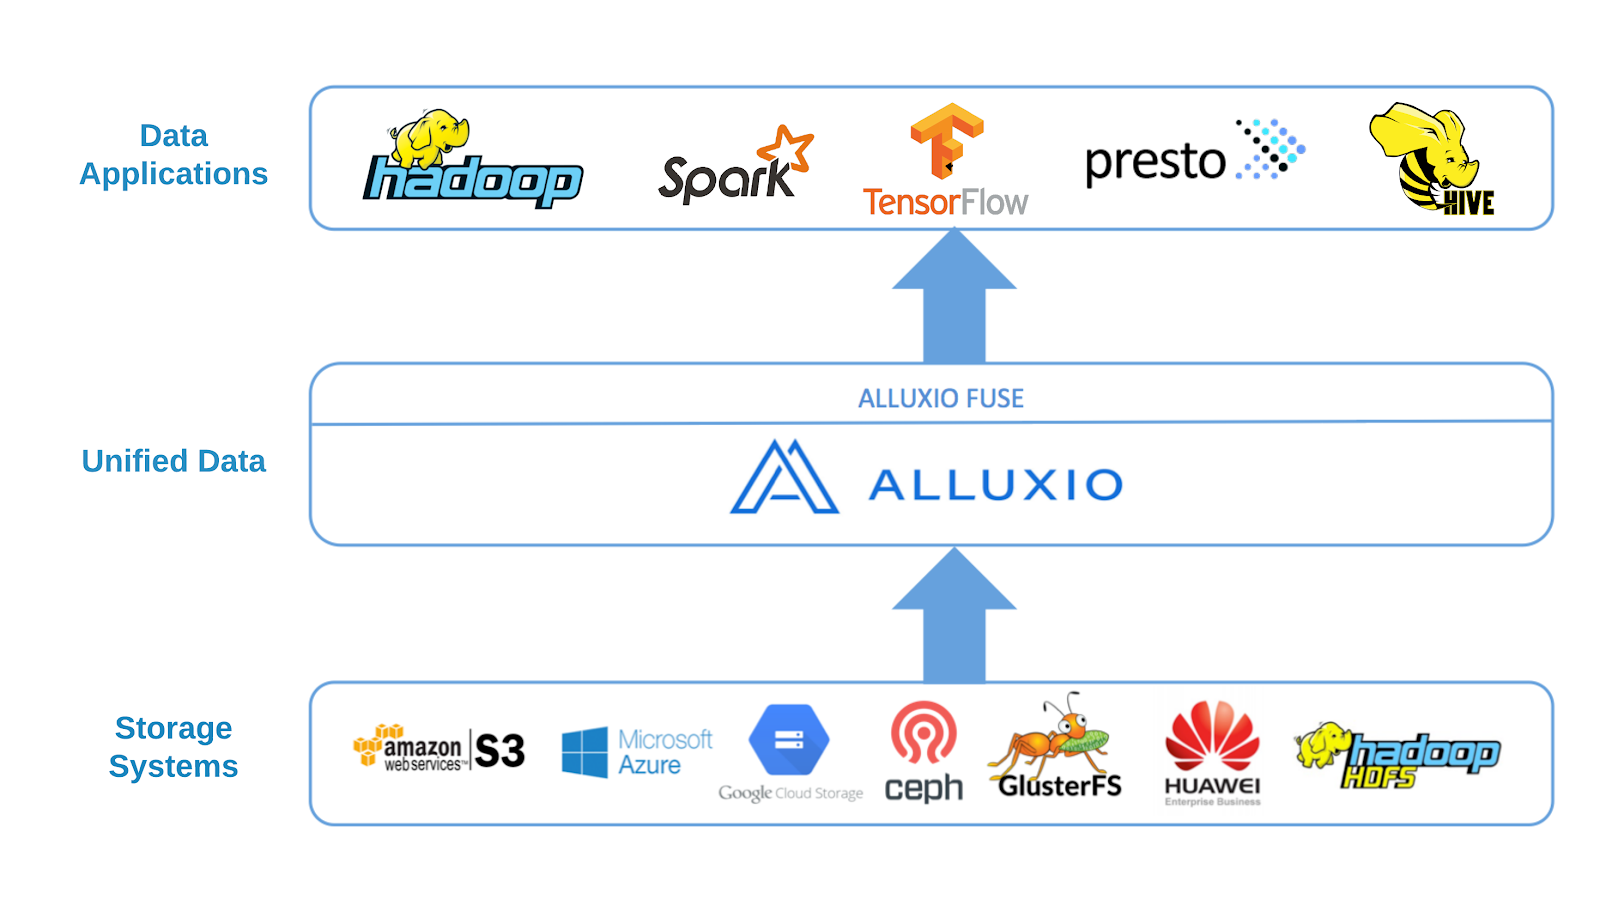
Alluxio POSIX API
Alluxio is a distributed virtual file system providing to distributed computation applications (e.g., Apache Spark, Presto) a unified namespace on top of disparate storages. It enables different applications to access numerous storage systems through a common interface and enables data access magnitude faster than existing solutions levering in-memory data caching. Alluxio provides a HDFS-compatible File System API so many frameworks for big data analytics like Apache Spark, Presto can use Alluxio directly without modifying their source code.
In addition, Alluxio also provides a POSIX API based on Filesystem in Userspace (FUSE), allowing mounting Alluxio storage service as a standard local file system on most flavors of Unix. The benefits of introducing Alluxio POSIX API include:
- Users can continue using familiar standard bash tools like ls, cat, dd, and mkdir to interact with the data living in distributed and remote storage systems like local files or directories.
- Applications which can interact with the local filesystem, no matter what languages (C, C++, Python, Ruby, Perl or Java) they are written in, can interact with Alluxio and its under storages without any Alluxio client integration or set up.
Note that, different from projects like s3fs, mountableHdfs which can mount specific storage service like S3 or HDFS as local filesystems, the Alluxio POSIX API is
- A generic solution for all storage systems supported by Alluxio
- Provides a rich data orchestration & caching service to speed up the I/O access to frequently used data in Alluxio worker memory space. Alluxio will evict stale data to make space for new data when Alluxio storage is full and the entire process is transparent to the applications and users.
Example: Tensorflow on Alluxio using data from AWS S3
In this section, we provide a hands-on example to demonstrate how to run Tensorflow applications using Alluxio POSIX API.
Step0: Install Fuse
On Linux:
$ yum install fuse fuse-devel
On MacOS, please download the osxfuse dmg file and follow the installation instructions.
Step1: Deploy Alluxio locally
First, we need to have a running Alluxio cluster. For simplicity, we deploy Alluxio in standalone mode. The prerequisite is that you have Java (JDK 8 or above) installed.
Download the binary distribution of Alluxio 2.0.0, unzip the tarball, enter the unzipped Alluxio folder and do the following configuration.
Setup minimal configuration for Alluxio
$ cp conf/alluxio-site.properties.template conf/alluxio-site.properties
$ echo alluxio.master.hostname=localhost >> conf/alluxio-site.properties
$ echo alluxio.underfs.address=/tmp/underFSStorage >> conf/alluxio-site.properties
Format and start the Alluxio service locally:
$./bin/alluxio-start.sh local -f
You should be able to verify the Alluxio cluster is running by checking Alluxio Web UI http://localhost:19999 using your web browser. For more details about how to deploy Alluxio locally, please view https://docs.alluxio.io/os/user/2.0/en/deploy/Running-Alluxio-Locally.html.
Step2: Mount S3 to Alluxio
We have already uploaded the ImageNet data training data in a public S3 bucket s3://alluxio-quick-start/tensorflow. Let us mount it into Alluxio path /training-data by running the following instruction with <ACCESS_KEY_ID> and <SECRET_KEY> replaced by your access and secret keys. These credentials are associated with the mounting point so that the future accesses will not require credentials.
$ bin/alluxio fs mount /training-data s3://alluxio-quick-start/tensorflow \
 --share --option alluxio.underfs.s3.inherit.acl=false \
 --option aws.accessKeyId= \
 --option aws.secretKey=
 Mounted s3://alluxio-quick-start/tensorflow at /training-data
Set the owner of this directory to the local user. Note that, this metadata change will only affect Alluxio space and not be persisted to the underlying S3 bucket which is read-only. Replace the <USER_NAME> and <GROUP_NAME> with your current user and group in the following command.
$ bin/alluxio fs chown <USER_NAME>:<GROUP_NAME> -R /training-data
After mounting, all the data in s3://alluxio-quick-start/tensorflow is transparently shown in Alluxio path /training-data.
$ bin/alluxio fs ls /training-data
-rwx---rwx ec2-user       ec2-user              88931400       PERSISTED 02-07-2019 03:56:09:000   0% /training-data/inception-2015-12-05.tgz
Step3: Mount Alluxio to a Local Directory
Next, let us create a local folder to mount Alluxio namespace as a local Linux directory. Create the directory, change its owner to the current user ($(whoami)), and change its permissions to allow read and write.
$ sudo mkdir -p /mnt/alluxio
$ sudo chown $(whoami) /mnt/alluxio
$ chmod 755 /mnt/alluxio
Mount the alluxio:///training-data to the existing and empty local folder we just created by running:
$ ./integration/fuse/bin/alluxio-fuse mount /mnt/alluxio /training-data
Alluxio-fuse mounted at /mnt/alluxio.
The above CLI spawns a background user-space java process (alluxio-fuse) that mounts the Alluxio path specified at /training-data to the local file system on the specified mount point /mnt/alluxio. Please refer to https://www.alluxio.org/docs/2.0/en/api/FUSE-API.html for details about how to mount Alluxio-FUSE and set up fuse related options.
After the two mount processes, the following three commands will show the exact same data.
$ aws s3 ls s3://alluxio-quick-start/tensorflow/
2019-02-07 03:51:15          0
2019-02-07 03:56:09   88931400 inception-2015-12-05.tgz
$ bin/alluxio fs ls /training-data
-rwx---rwx ec2-user       ec2-user              88931400       PERSISTED 02-07-2019 03:56:09:000   0% /training-data/inception-2015-12-05.tgz
$ ls -l /mnt/alluxio
total 0
-rwx---rwx 0 ec2-user ec2-user 88931400 Feb  7 03:56 inception-2015-12-05.tgz
Data in s3 data storage becomes immediately available through Alluxio POSIX API and can be transparently accessed to Tensorflow applications without any modification to either Tensorflow or its scripts. Providing data in under storages is just as easy as providing them in local filesystems.
Step4: Run Tensorflow image recognition
To run Tensorflow image recognition test, please install Tensorflow first which can be easily installed through pip. After installing Tensorflow, you can download the classify_image.py which is an image recognition script and run it with the mount point.
$ python classify_image.py --model_dir /mnt/alluxio
This will use the input data in /mnt/fuse/inception-2015-12-05.tgz to recognize images, write some intermediate data to /mnt/fuse and if everything worked successfully you will see in your command prompt:
giant panda, panda, panda bear, coon bear, Ailuropoda melanoleuca (score = 0.89107)
indri, indris, Indri indri, Indri brevicaudatus (score = 0.00779)
lesser panda, red panda, panda, bear cat, cat bear, Ailurus fulgens (score = 0.00296)
custard apple (score = 0.00147)
earthstar (score = 0.00117)
Step5: Stop Alluxio services
After running the Spark wordcount, you can follow Alluxio doc to play with Alluxio and its POSIX API, or stop it by running:
$ ./integration/fuse/bin/alluxio-fuse umount /mnt/alluxio
Unmount fuse at /mnt/alluxio
$ ./bin/alluxio-stop.sh local
In this example, we only show how to run Tensorflow image recognition using data from s3 through Alluxio POSIX API, but you are welcome to extend it to run other big data computation frameworks (including deep learning frameworks) on top of the storage system on your favour through Alluxio POSIX API.
Future Work
Although Alluxio POSIX API has the outstanding benefits, given the intrinsic characteristics of Alluxio, like its write-once/read-many-times file data model, the mounted filesystem will not have full POSIX semantics. Alluxio POSIX API has the following limitations:
- Files can be written sequentially only once, and never be modified after file closed. Appending or overriding a file is not allowed. An explicit combination of delete and then create is needed. For example,
vicommand is not supported andcpcommand will fail when the destination file exists. - Alluxio does not have hard-link and soft-link concepts, so the commands like
lnare not supported, neither the hard-link number is displayed inlloutput. - Alluxio POSIX API is based on the project Filesystem in Userspace and built on top of jnr-fuse. Due to the conjunct use of FUSE and JNR, the performance of the mounted file system is expected to be slightly poor than what you would see by using the Alluxio Java client directly.