This is a guest blog by Naveen K T with an original blog source.
I recently worked on a PoC evaluating Nomad for a client. Since there were certain constraints limiting what was possible on the client environment, I put together something “quick” on my personal workstation to see what was required for Alluxio to play nice with Nomad.
Getting up and running with Nomad is fairly quick and easy; download the compressed binary, extract and start the Nomad agent in dev mode. Done! Getting Alluxio to run on Nomad turned out to be a little more involved than I thought. One major issue I ran into quite early on in the exercise was that Nomad doesn’t yet support persistent storage natively (expected in the next release).
Since I was using Docker to deploy Alluxio, using the Docker volume plugin to integrate with a storage system seemed liked a workable option and I settled on GlusterFS after some research online. I used VMWare Fusion and ending up creating 7 Linux VMs and setup static IPs, but the setup should work on Virtualbox too.

GlusterFS Cluster
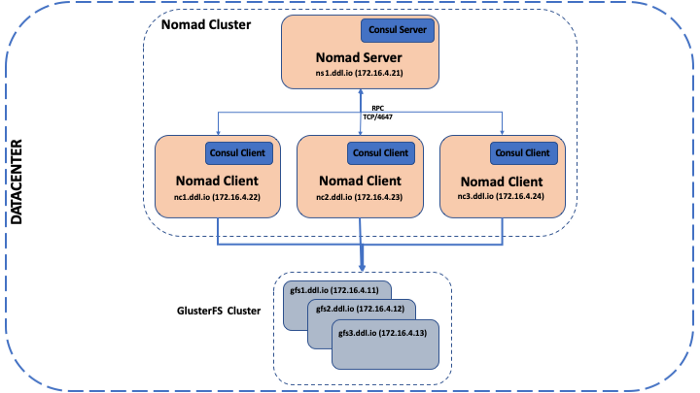
I setup a 3 Node GlusterFS cluster on Fedora 30 VMs and since this is a sandbox environment, I used a single disk for both the OS and the storage. My 3 node cluster looked like the folllwing:
Storage Node 1:
- Hostname: gfs1.ddl.io
- IP address: 172.16.4.11
- Mount point: /gfsvolume/gv0
Storage Node 2:
- Hostname: gfs2.ddl.io
- IP address: 172.16.4.12
- Mount point: /gfsvolume/gv0
Storage Node 3:
- Hostname: gfs1.ddl.io
- IP address: 172.16.4.13
- Mount point: /gfsvolume/gv0
Install and configure GlusterFS
To install, on each node open a terminal and type the following at the prompt:
$ sudo dnf update
$ sudo dnf install glusterfs-server
$ sudo systemctl enable glusterd
$ sudo systemctl start glusterd
Now that GlusterFS is installed, we’ll configure the storage volume. On Node 1, type the following at the terminal prompt to create a trusted storage pool:
$ sudo gluster peer probe 172.16.4.12
$ sudo gluster peer probe 172.16.4.13
Next, well create the distributed GlusterFS volume and start it.
$ sudo gluster volume create nomadvolume transport \
  tcp 172.16.4.11:/gfsvolume/gv0 172.16.4.12:/gfsvolume/gv0 \
  172.16.4.13:/gfsvolume/gv0
$ sudo gluster volume start nomadvolume
For additional info on GlusterFS, you can check out the GlusterFS docs here.
Nomad Cluster
The Nomad cluster consists of 1 server and 3 client nodes. Each of the client nodes also runs a Consul agent and Docker, and the Consul server is run on the Nomad server node. We will be using Consul as the KV store for the Docker overlay network.
The Consul and Nomad binaries can be downloaded here and here.
Nomad Server:
- Hostname: ns1.ddl.io
- IP address: 172.16.4.21
Nomad Client Node 1:
- Hostname: nc1.ddl.io
- IP address: 172.16.4.22
Nomad Client Node 2:
- Hostname: nc2.ddl.io
- IP address: 172.16.4.23
Nomad Client Node 3:
- Hostname: nc3.ddl.io
- IP address: 172.16.4.24
Consul Install
To install the Consul server (172.16.4.21), on extract the binary to /usr/local/consul and add the path to the environment. Consul can be started by running the following at the terminal prompt:
$ consul agent -ui -dev -bind="172.16.4.21" -client="0.0.0.0"
Next, we’ll install the Consul agents. We will be installing an agent on each of the Nomad clients. To install and start the agents, do the following on each of the Nomad client nodes.
- Extract the Consul binary to /usr/local/consul and add the path to the environment.
- At the terminal prompt, type the following:
$ sudo mkdir /etc/consul.d
$ sudo tee /etc/consul.d/consul.hcl > /dev/null <<EOF
    datacenter = "dc1"
    data_dir = "/opt/consul"
    performance {raft_multiplier = 1}
    retry_join = ["172.16.4.21"]
    client_addr = "172.16.4.22"
    bind_addr = "{{ GetInterfaceIP \"ens33\" }}"
    log_level = "TRACE"
    enable_syslog = true
  EOF
Change the client_addr to the IP address of the node on which the client is running.
To start the Consul client, execute the following:
$ sudo env PATH=$PATH consul agent -config-dir=/etc/consul.d
For additional info, please refer to the Consul docs here.
Nomad Install
To install the Nomad server (172.16.4.21), on extract the binary to /usr/local/nomad and add the path to the environment.
To configure the server, execute the following at the terminal prompt:
$ sudo mkdir /etc/nomad.d
$ sudo tee /etc/nomad.d/server.hcl > /dev/null <<EOF
    enable_syslog = true
    log_level = "DEBUG"
    bind_addr = "0.0.0.0"

    datacenter = "dc1"

    # Setup data dir
    data_dir = "/home/pocuser/nomad/server"

    advertise {
        # This should be the IP of THIS MACHINE and must be routable     by every node
        # in your cluster
        rpc = "172.16.4.21:4647"
    }

    # Enable the server
    server {
        enabled = true
        # Self-elect, should be 3 or 5 for production
        bootstrap_expect = 1
    }
EOF
Start the Nomad server by executing the following:
$ sudo env PATH=$PATH nomad agent -config=/etc/nomad.d
To install and start the Nomad clients, do the following on each of the Nomad client nodes.
- Extract the Nomad binary to /usr/local/nomad and add the path to the environment.
- To configure the client, execute the following at the terminal prompt:
$ sudo mkdir /etc/nomad.d
$ sudo tee /etc/nomad.d/client.hcl > /dev/null <<EOF
    data_dir = "/home/ntogar/nomad/data"
    bind_addr = "0.0.0.0"

    ports {
      http = 4646
      rpc  = 4647
      serf = 4648
    }

    client {
      enabled       = true
      network_speed = 10
      servers = ["172.16.4.21:4647"]
      options {
        "docker.privileged.enabled" = "true"
        "driver.raw_exec.enable" = "1"
      }
    }
    consul {
      address = "172.16.4.22:8500"
    }
EOF
The Nomad clients should always connect to the Consul client and never directly to the server. Change the IP to the Consul agent running on the client node.
To start the Nomad client
$ sudo env PATH=$PATH nomad agent -config=/etc/nomad.d
For additional info, please refer to the Nomad docs here.
Alluxio
Running Alluxio on Nomad takes a little prep work.
- Create a Docker volume to mount the GlusterGS distributred storage in the containers.
- Configure Alluxio and build a Docker image
- Setup a local Docker registry
- Configure Docker to use Consul as the KV store
- Create a Docker overlay network
Docker Volume
As Nomad doesn’t natively support persistent storage, we will be installing a Docker volume plugin for GlusterFS. To install and create a volume, run the following:
$ sudo docker plugin install --alias glusterfs mikebarkmin/glusterfs
$ sudo docker volume create -d glusterfs -o \
  servers=172.16.4.11,172.16.4.12,172.16.4.13 \
  -o volname=nomadvolume nomadvolume
Configure Alluxio
We will then configure Alluxio to use the distributed storage. Download Alluxio and unzip the to ~/alluxio. To configure the Alluxio site properties:
$ cd ~/alluxio/integration/docker
$ cp conf/alluxio-site.properties.template \
  conf/alluxio-site.properties
Edit conf/alluxio-site.properties and add the following line:
alluxio.master.mount.table.root.ufs=/mnt/gfsvol.
Next, we will build a Docker image
$ sudo docker build -t alluxio-docker .
Nomad downloads the image at runtime from a registry, so we will setup a local Docker registry and push the Alluxio image to the registry.
Docker Changes
Docker has to be configured to use Consul as the KV store for the overlay network to work. First create /etc/docker/daemon.json on the Nomad client nodes and paste the following
{
     “insecure-registries”: [“172.16.4.21:5000”],
     “debug”: false,
     “cluster-store”: “consul://172.16.4.21:8500”,
     “cluster-advertise”: “172.16.4.22:0”
}
Restart Docker daemon
$ sudo systemctl restart docker
Create Docker Overlay Network
To create an overlay network, run the following
$ sudo docker network create --driver overlay --subnet \
  192.168.0.0/24 nomad_cluster
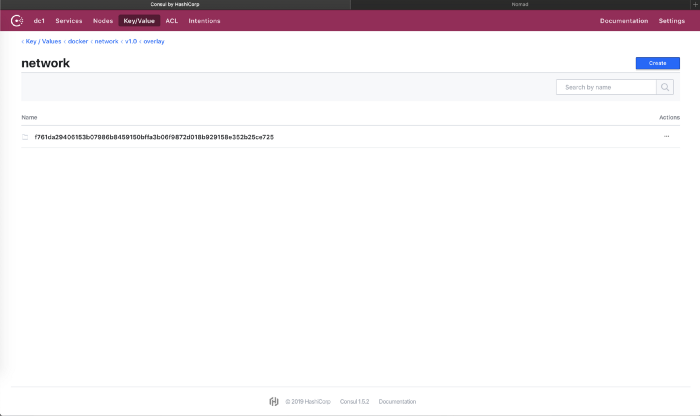
f761da29406153b07986b8459150bffa3b06f9872d018b929158e352b25ce725
You can now open the Consul UI at (http://72.16.4.21:8500)and see the network under Key/Value.

Running a Nomad Job
Nomad Job
Let’s create a Nomad job spec, alluxio.nomad to run 1 Alluxio master and 2 workers. We will create 2 job groups, 1 for the master and 1 for the workers.
job "alluxio-docker" {
  datacenters = ["dc1"]
  type = "service"

  update {
    stagger      = "30s"
    max_parallel = 1
  }

group "alluxio-masters" {
    count = 1

#### Alluxio Master Node ####
    task "master" {
      driver = "docker"

config {
        image = "172.16.4.21:5000/alluxio-docker"
        args = ["master"]
        network_aliases = ["alluxiomaster"]
        network_mode = "nomad_cluster"
        volumes = ["nomadvolume:/mnt/gfsvol"]
        volume_driver = "glusterfs"
        dns_servers = ["169.254.1.1"]
        port_map = {
          master_web_port = 19999
        }
      }

service {
        name = "alluxio"
        tags = ["master"]
        port = "master_web_port"

check {
          type     = "tcp"
          port     = "master_web_port"
          interval = "10s"
          timeout  = "2s"
        }
      }

resources {
        network {
          mbits = 5
          port "master_web_port" {
            static = 19999
          }
        }
      }
    }

}

group "alluxio-workers" {
    count = 2

#### Alluxio Worker Node ####
    task "worker" {
      driver = "docker"

config {
        image = "172.16.4.21:5000/alluxio-docker"
        args = ["worker"]
        network_aliases = ["alluxioworker"]
        network_mode = "nomad_cluster"
        shm_size = 1073741824
        volumes = ["nomadvolume:/mnt/gfsvol"]
        volume_driver = "glusterfs"
        dns_servers = ["169.254.1.1"]
        port_map = {
          worker_web_port = 30000
        }
      }

env {
        ALLUXIO_JAVA_OPTS = "-Dalluxio.worker.memory.size=1G -Dalluxio.master.hostname=alluxiomaster"
      }

service {
        name = "alluxio"
        tags = ["worker"]
        port = "worker_web_port"

        check {
          type     = "tcp"
          port     = "worker_web_port"
          interval = "10s"
          timeout  = "2s"
        }
      }

resources {
        cpu = 1000
        memory = 1024
        network {
          mbits = 5
          port "worker_web_port" {
            static = 30000
          }
        }
      }
    }
  }
}
Now, run the job
$ nomad job run alluxio.nomad
==> Monitoring evaluation "4470746e"
    Evaluation triggered by job "alluxio-docker"
    Evaluation within deployment: "b471e355"
    Allocation "62224435" created: node "d6313535", group "alluxio-workers"
    Allocation "bbaa6675" created: node "66b502e3", group "alluxio-workers"
    Allocation "c8ea32ff" created: node "d6313535", group "alluxio-masters"
    Evaluation status changed: "pending" -> "complete"
==> Evaluation "4470746e" finished with status "complete"
Let’s check the status of the running job
$ nomad job status alluxio-docker
ID            = alluxio-docker
Name          = alluxio-docker
Submit Date   = 2019-08-06T18:16:03+05:30
Type          = service
Priority      = 50
Datacenters   = dc1
Status        = running
Periodic      = false
Parameterized = false

Summary
Task Group       Queued  Starting  Running  Failed  Complete  Lost
alluxio-masters  0       0         1        0       0         0
alluxio-workers  0       0         2        0       0         0

Latest Deployment
ID          = b471e355
Status      = successful
Description = Deployment completed successfully

Deployed
Task Group       Desired  Placed  Healthy  Unhealthy  Progress Deadline
alluxio-masters  1        1       1        0          2019-08-06T18:26:38+05:30
alluxio-workers  2        2       2        0          2019-08-06T18:27:03+05:30

Allocations
ID        Node ID   Task Group       Version  Desired  Status   Created    Modified
62224435  d6313535  alluxio-workers  0        run      running  1m13s ago  15s ago
bbaa6675  66b502e3  alluxio-workers  0        run      running  1m13s ago  13s ago
c8ea32ff  d6313535  alluxio-masters  0        run      running  1m13s ago  37s ago
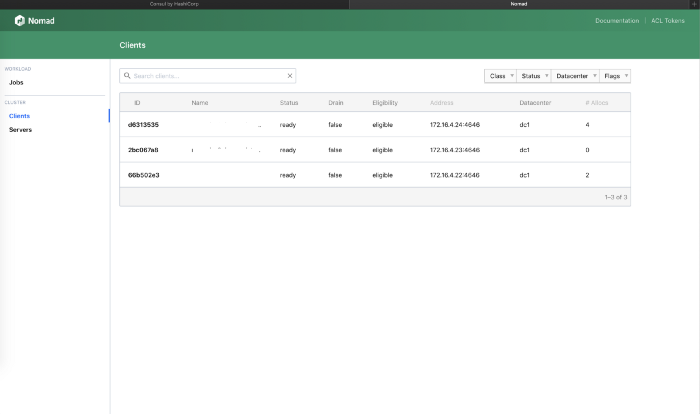
If we look at the job status output, under Allocations, we notice two allocations running on client node with ID d6313535 and one on client node with ID 66b502e3. We can bring up the Nomad UI (http://172.16.4.21:4646) and under clients see the different nodes in the cluster.

Let’s check the nodes for running containers
Nomad Client Node 1

Nomad Client Node 3

Test the Cluster
Open a terminal on the Alluxio worker container running on Node 1 and run the Alluxio tests.
$ sudo docker exec -it 8fc5526d467f /bin/bash
Run the tests and check the output under /mnt/gfsvol (refer to volume in the Nomad job spec).
bash-4.4# cd /opt/alluxio
bash-4.4# ./bin/alluxio runTests
2019-08-06 13:25:17,290 INFO  NettyUtils - EPOLL_MODE is available
2019-08-06 13:25:17,472 INFO  TieredIdentityFactory - Initialized tiered identity TieredIdentity(node=8fc5526d467f, rack=null)
2019-08-06 13:25:18,297 INFO  ConfigurationUtils - Alluxio client has loaded configuration from meta master alluxiomaster/192.168.0.4:19998
2019-08-06 13:25:18,305 INFO  ConfigurationUtils - Alluxio client (version 2.0.0) is trying to load cluster level configurations
2019-08-06 13:25:18,318 INFO  ConfigurationUtils - Alluxio client has loaded cluster level configurations
2019-08-06 13:25:18,318 INFO  ConfigurationUtils - Alluxio client (version 2.0.0) is trying to load path level configurations
2019-08-06 13:25:18,380 INFO  ConfigurationUtils - Alluxio client has loaded path level configurations
runTest BASIC CACHE_PROMOTE MUST_CACHE
2019-08-06 13:25:19,563 INFO  BasicOperations - writeFile to file /default_tests_files/BASIC_CACHE_PROMOTE_MUST_CACHE took 635 ms.
2019-08-06 13:25:19,659 INFO  BasicOperations - readFile file /default_tests_files/BASIC_CACHE_PROMOTE_MUST_CACHE took 96 ms.
Passed the test!
runTest BASIC_NON_BYTE_BUFFER CACHE_PROMOTE MUST_CACHE
2019-08-06 13:25:19,751 INFO  BasicNonByteBufferOperations - writeFile to file /default_tests_files/BASIC_NON_BYTE_BUFFER_CACHE_PROMOTE_MUST_CACHE took 41 ms.
2019-08-06 13:25:19,775 INFO  BasicNonByteBufferOperations - readFile file /default_tests_files/BASIC_NON_BYTE_BUFFER_CACHE_PROMOTE_MUST_CACHE took 24 ms.
Passed the test!
...................
bash-4.4# ls -l /mnt/gfsvol/default_tests_files/
total 9
-rw-r--r--    1 root     root            80 Aug  6 13:25 BASIC_CACHE_ASYNC_THROUGH
-rw-r--r--    1 root     root            80 Aug  6 13:25 BASIC_CACHE_CACHE_THROUGH
-rw-r--r--    1 root     root            80 Aug  6 13:25 BASIC_CACHE_PROMOTE_ASYNC_THROUGH
-rw-r--r--    1 root     root            80 Aug  6 13:25 BASIC_CACHE_PROMOTE_CACHE_THROUGH
-rw-r--r--    1 root     root            80 Aug  6 13:25 BASIC_CACHE_PROMOTE_THROUGH
-rw-r--r--    1 root     root            80 Aug  6 13:25 BASIC_CACHE_THROUGH
-rw-r--r--    1 root     root            84 Aug  6 13:25 BASIC_NON_BYTE_BUFFER_CACHE_ASYNC_THROUGH
-rw-r--r--    1 root     root            84 Aug  6 13:25 BASIC_NON_BYTE_BUFFER_CACHE_CACHE_THROUGH
-rw-r--r--    1 root     root            84 Aug  6 13:25 BASIC_NON_BYTE_BUFFER_CACHE_PROMOTE_ASYNC_THROUGH
-rw-r--r--    1 root     root            84 Aug  6 13:25 BASIC_NON_BYTE_BUFFER_CACHE_PROMOTE_CACHE_THROUGH
-rw-r--r--    1 root     root            84 Aug  6 13:25 BASIC_NON_BYTE_BUFFER_CACHE_PROMOTE_THROUGH
-rw-r--r--    1 root     root            84 Aug  6 13:25 BASIC_NON_BYTE_BUFFER_CACHE_THROUGH
-rw-r--r--    1 root     root            84 Aug  6 13:25 BASIC_NON_BYTE_BUFFER_NO_CACHE_ASYNC_THROUGH
-rw-r--r--    1 root     root            84 Aug  6 13:25 BASIC_NON_BYTE_BUFFER_NO_CACHE_CACHE_THROUGH
-rw-r--r--    1 root     root            84 Aug  6 13:25 BASIC_NON_BYTE_BUFFER_NO_CACHE_THROUGH
-rw-r--r--    1 root     root            80 Aug  6 13:25 BASIC_NO_CACHE_ASYNC_THROUGH
-rw-r--r--    1 root     root            80 Aug  6 13:25 BASIC_NO_CACHE_CACHE_THROUGH
-rw-r--r--    1 root     root            80 Aug  6 13:25 BASIC_NO_CACHE_THROUGH
Next we’ll open a terminal on the Alluxio worker container running on Node 3 and look at the results of the output.
$ sudo docker exec -it acdfccaf3b81 /bin/bash

#### Container #####

bash-4.4# ls -l /mnt/gfsvol/default_tests_files/
total 9
-rw-r--r--    1 root     root            80 Aug  6 13:25 BASIC_CACHE_ASYNC_THROUGH
-rw-r--r--    1 root     root            80 Aug  6 13:25 BASIC_CACHE_CACHE_THROUGH
-rw-r--r--    1 root     root            80 Aug  6 13:25 BASIC_CACHE_PROMOTE_ASYNC_THROUGH
-rw-r--r--    1 root     root            80 Aug  6 13:25 BASIC_CACHE_PROMOTE_CACHE_THROUGH
-rw-r--r--    1 root     root            80 Aug  6 13:25 BASIC_CACHE_PROMOTE_THROUGH
-rw-r--r--    1 root     root            80 Aug  6 13:25 BASIC_CACHE_THROUGH
-rw-r--r--    1 root     root            84 Aug  6 13:25 BASIC_NON_BYTE_BUFFER_CACHE_ASYNC_THROUGH
-rw-r--r--    1 root     root            84 Aug  6 13:25 BASIC_NON_BYTE_BUFFER_CACHE_CACHE_THROUGH
-rw-r--r--    1 root     root            84 Aug  6 13:25 BASIC_NON_BYTE_BUFFER_CACHE_PROMOTE_ASYNC_THROUGH
-rw-r--r--    1 root     root            84 Aug  6 13:25 BASIC_NON_BYTE_BUFFER_CACHE_PROMOTE_CACHE_THROUGH
-rw-r--r--    1 root     root            84 Aug  6 13:25 BASIC_NON_BYTE_BUFFER_CACHE_PROMOTE_THROUGH
-rw-r--r--    1 root     root            84 Aug  6 13:25 BASIC_NON_BYTE_BUFFER_CACHE_THROUGH
-rw-r--r--    1 root     root            84 Aug  6 13:25 BASIC_NON_BYTE_BUFFER_NO_CACHE_ASYNC_THROUGH
-rw-r--r--    1 root     root            84 Aug  6 13:25 BASIC_NON_BYTE_BUFFER_NO_CACHE_CACHE_THROUGH
-rw-r--r--    1 root     root            84 Aug  6 13:25 BASIC_NON_BYTE_BUFFER_NO_CACHE_THROUGH
-rw-r--r--    1 root     root            80 Aug  6 13:25 BASIC_NO_CACHE_ASYNC_THROUGH
-rw-r--r--    1 root     root            80 Aug  6 13:25 BASIC_NO_CACHE_CACHE_THROUGH
-rw-r--r--    1 root     root            80 Aug  6 13:25 BASIC_NO_CACHE_THROUGH
Conclusion
This was my first time using Nomad and while there were a few things that took some time for me to get working, it was relatively easy to setup. The simplicity and limited scope of Nomad is by design, but not having native support for persistent storage or network namespaces could be an issue at some companies. This is being addresses in v0.10 that is expected in September and would make Nomad an even more attractive alternative to Kubernetes.
This is Part 1 in a two part series of using Nomad for Docker orchestration. I’m looking at adding Presto to the mix and using Terraform to manage the lot; will document that effort in Part 2. There is also some redundant configuration that I’ll cleanup before then.
I hope you found this useful. Feel free to reach out if you have any questions, and feedback is always appreciated.
Cheers!